If you’re a guitar player, you know the bliss of putting on a fresh set of new strings. The instrument suddenly comes alive, the notes ring out with a clarity and sustain that wasn’t there before! But before you can experience that rush of sound and sensation, you have to go through a whole process to restring an electric guitar properly. In this article, we’ll go over how to change a string on an electric guitar in case of breakage, how to prevent it, and how to maintain your strings.
Having to restring an electric guitar is a task that many guitarists dread, but it’s also one of the most essential and rewarding aspects of guitar maintenance. Whether you’re a seasoned pro or just starting out, we hope you find a valuable gem of information below. So grab your wire cutters and your favorite set of strings, and let’s get started!

Related: All the parts that make up an electric guitar
Electric Guitar String Basics
Strings on an electric guitar are made up of a metal wire that is wound around a core. The core can be made of different materials, including steel, nickel, or other metals. The winding can also be made of different materials, such as pure nickel, nickel-plated steel, or stainless steel.
The gauge, or thickness, of the strings can also vary. Lighter gauge strings are easier to play and bend, making them popular for lead guitar playing, while a heavier gauge string sounds deeper & produces a thicker, more powerful tone that is ideal for rhythm playing or heavier styles of music.
Different string gauges and materials can also affect the overall feel and sound of the guitar. Some guitarists prefer the warmer, more mellow tone of nickel strings, while others prefer the brighter, crisper tone of stainless steel strings. Similarly, some guitarists prefer the feel of thicker gauge strings, while others find them too stiff and prefer the ease of playing with lighter gauge strings.
Ultimately, the choice of electric guitar strings will depend on the individual player’s style, preferences, and playing level. Experimenting with different gauges and materials can help guitarists find the perfect set of strings that best suits their playing style and musical goals.
As it relates to string changing, try to match the set of the strings that are already on your guitar. So if you had a set of light gauge strings & you broke your top E string which was a .09 gauge, try and find another .09 string gauge to replace it.
Replacing a guitar string with the same gauge is important because it ensures that the tension and overall feel of the guitar remains consistent. Guitar strings are designed to have a specific tension when they are tuned to standard pitch, and changing to a different gauge can alter this tension.
Related: What are the names of all 6 strings

When To Change Your Strings On Your Electric Guitars
“How do I know if my guitar strings need changing?” You might ask. Well, there are several signs that can indicate that it’s time to change strings on your guitar & that the strings have gone bad. Here’s what to look out for:
Breakage:
If a string breaks while you are playing, it’s obviously time to change it.
However, it’s a good idea to change all of the strings at once to ensure consistent tone and tension.
The exception is if you’re installing a set of new strings & happen to accidentally snap one string. In this case, you really just need to replace the one string that broke as all the others will be brand new.
If this is a recurring issue, you might want to keep some individual strings on hand, or consider inspecting the hardware on your guitar for sharp edges or worn out parts.
Loss of tone:
Over time, old strings can lose their brightness and clarity, which can result in a dull, muddy tone.
If you notice a significant loss of tone in your guitar, or it just sounds lifeless, it may be time to change out those old strings & revitalize your sound.
Difficulty tuning:
Old strings can also become difficult to tune, and may not hold their pitch as well as newer strings.
If you find yourself constantly retuning your guitar, it may be a sign that the strings are due for a change.
It would also be wise to inspect your tuning pegs to make sure they are working properly, all the screws are tight, and that the tuning pegs or strings are not slipping.
Rust or discoloration:
If you notice rust or discoloration on your strings, it’s a sign that they are beginning to corrode and may break soon.
This is especially true if the strings are discolored near the frets where they are most heavily played.
This rust is not only visible, but often times you can just feel a grittiness when you slide your fingers down the strings. If your old strings feel like gritty sandpaper, it’s time for them to go! (and maybe clean your guitar’s fretboard too)
Visible wear:
Strings can become worn from constant playing, and may develop flat spots or become frayed or damaged. If you notice visible signs of wear on your strings, it’s also time to replace them.
How To Change Strings For Electric Guitar
Changing your guitar strings is important for maintaining the quality & tone of your instrument. New strings not only sound better, but they also feel better to play, making it easier to execute techniques and play with precision.
Additionally, regularly changing your strings can help to prevent buildup of dirt and sweat on your guitar, which can lead to corrosion and damage over time. Here are the simple steps to restring an electric guitar:
Gather the necessary tools:
Step 1 is to gather the right string changing tools tools for the job. You will need a set of strings or a replacement string, wire cutters or pliers, and a string winder (optional).
It’s also a good idea to place a blanket underneath your guitar or find a soft surface to work on.
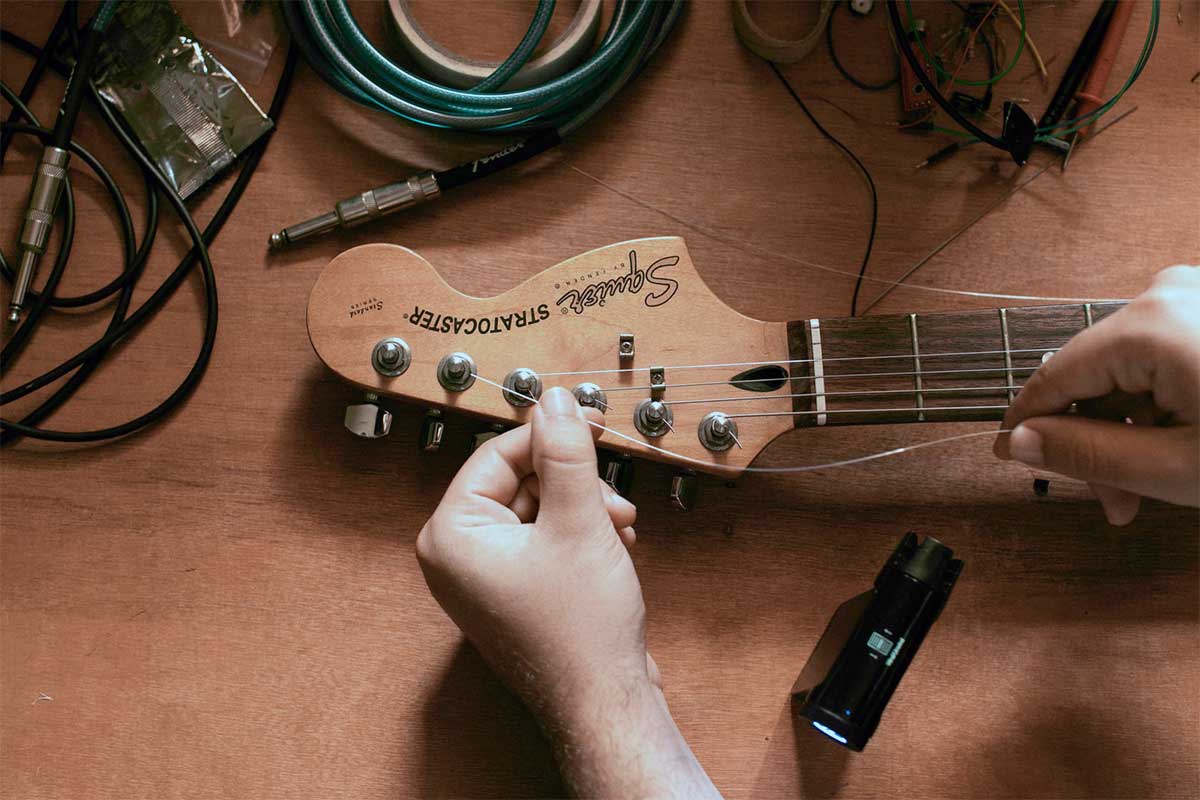
Loosen and remove the old string:
To begin, turn the tuning post for the string you want to replace counterclockwise until the string becomes loosened.
Use wire cutters or pliers to snip the string near the bridge, then unwind the string from the tuning post.
If the wire is already broken, just undo it from the peg & remove the string by the ball end from the bridge.
Clean the fretboard and bridge:
With the string/s off, now is a good time to do a bit of cleaning. Use a soft cloth to clean the frets & fretboard, removing any dirt or debris that you can’t normally get to with the string/s on.
Install the new string:
Insert the ball end of the new string into the appropriate hole on the bridge, making sure it’s securely in place.
Next, wrap the string clockwise onto the appropriate tuning peg. Give it 2-3 wraps for wounded strings & 3-4 wraps for plain strings BEFORE inserting the strings through the peg hole.
The wraps are to prevent the string from slipping as you add string tension in the next step. Meanwhile you just want to hold the string tightly around the peg to prevent it from coming loose.
Wind the string using the tuning peg:
Next step is to use the string winder (or your fingers) to wind the string by turning the tuning peg clockwise until it’s tight & holding tension.
To test the tension, simply pluck the string until it starts to feel playable & has a bit of sustain. No need to tighten it further at this point until we get to the next step.
Tune the string:
Now we use an electronic tuner or tuning app to tune the string to the correct pitch. You will want to tune all of the other strings as well to have everything nice & balanced.
Stretch and re-tune the strings:
This next step is crucial for tuning stability. Once all the strings have been tuned, gently pull on each string to stretch it out. You can also throw in some string bends around the middle of the fretboard to do accomplish this.
If your guitar goes out of tune at this stage, that is normal for new strings. That means they’ve been stretched properly & getting used to the new tension.
The last step in this stage is to re-tune the guitar since the strings have stretched out of tune. You can repeat this step again if you want to be really thorough, or you will probably have to re-tune 1 more time in the near-future anyways as the strings settle in fully.
Cut off the excess string:
Finally, use wire cutters or pliers to snip off the excess string close to the tuning peg.
If you don’t have pliers, you can simply bend the string back & forth close to the tuning peg. This sharp bend will create a crease in the metal & if done repeatedly (and carefully), will cause it to break cleanly at the kink. It’s easy to do on the wounded strings but can be tricky on the plain ones.

Related: How to adjust your electric guitar’s action (string height)
Tips For Maintaining Your Guitar Strings
Over time, guitar strings accumulate dirt, sweat, and oils, which can cause them to corrode, lose their brightness, and become harder to play.
Proper maintenance, including cleaning and replacing strings, can help keep your guitar sounding and playing its best, while also reducing the risk of damage to the instrument.
Wipe down your strings after playing:
Use a clean, dry cloth to wipe down your strings after each playing session. This will help to remove any dirt, sweat, or oils that may have accumulated on the strings, which can cause them to corrode and wear out faster.
Keep your guitar in a case or stand:
When not in use, store your guitar in a case or on a stand. This will help to protect the strings from dust, dirt, and other debris that can accumulate on the strings and cause them to wear out faster.
Use string lubricant:
Applying a small amount of string lubricant to your strings can help to keep them feeling smooth and playing well. This can be especially helpful if you live in a dry climate, which can cause strings to become brittle and break more easily.
Stretch your strings after installing them:
When you install a new set of strings, be sure to stretch them out by gently pulling on each string until it feels taut. This will help to ensure that the strings settle into place and stay in tune better.
Change your strings frequently:
As mentioned earlier, it’s important to change your guitar strings regularly to maintain their tone and playability. Depending on how often you play, you may need to change your strings every 3-6 months.

Frequently Asked Questions
How often should you change electric guitar strings?
The frequency of changing strings depends on factors such as playing frequency, playing style, string type, and environmental factors.
Generally, it’s recommended to change the strings every 3-6 months if you play very casually.
However it’s not uncommon to replace strings every month for avid players or sooner for those who often play live shows.
Is re-stringing electric guitars easy?
It’s easy to restring an electric guitar with the right tools and some practice.
Most guitarists, or anyone really, can do it & there’s plenty of tutorials online like this one to offer guidance.
However, it can be more difficult & complex to restring an electric guitar with a floating bridge or tremolo system. In this case, professional help may be necessary for some people.
Can you change electric guitar strings without a string winder?
Yes it’s absolutely possible to change your strings without a string winder. Even pliers or wire cutters are optional & a string can be changed without any tools if you have the right know-how.

Will changing guitar strings stop buzzing?
Changing guitar strings may help reduce buzzing in some cases, but it is not always the solution to eliminate it completely.
Buzzing can be caused by a variety of factors, such as an uneven fret, an improperly adjusted bridge or truss rod, or even a technique issue.
Therefore, it’s important to identify the root cause of the buzzing before assuming that changing strings will solve the problem.
Related: Why do my guitar strings rattle or buzz?
What is the average life of electric guitar strings?
The lifespan of guitar strings depends on how often you play & environmental factors such as humidity which will corrode the metal. For a casual player, strings can last anywhere from 3-6 months. Just be sure to keep strings or your instrument in a cool & dry place.