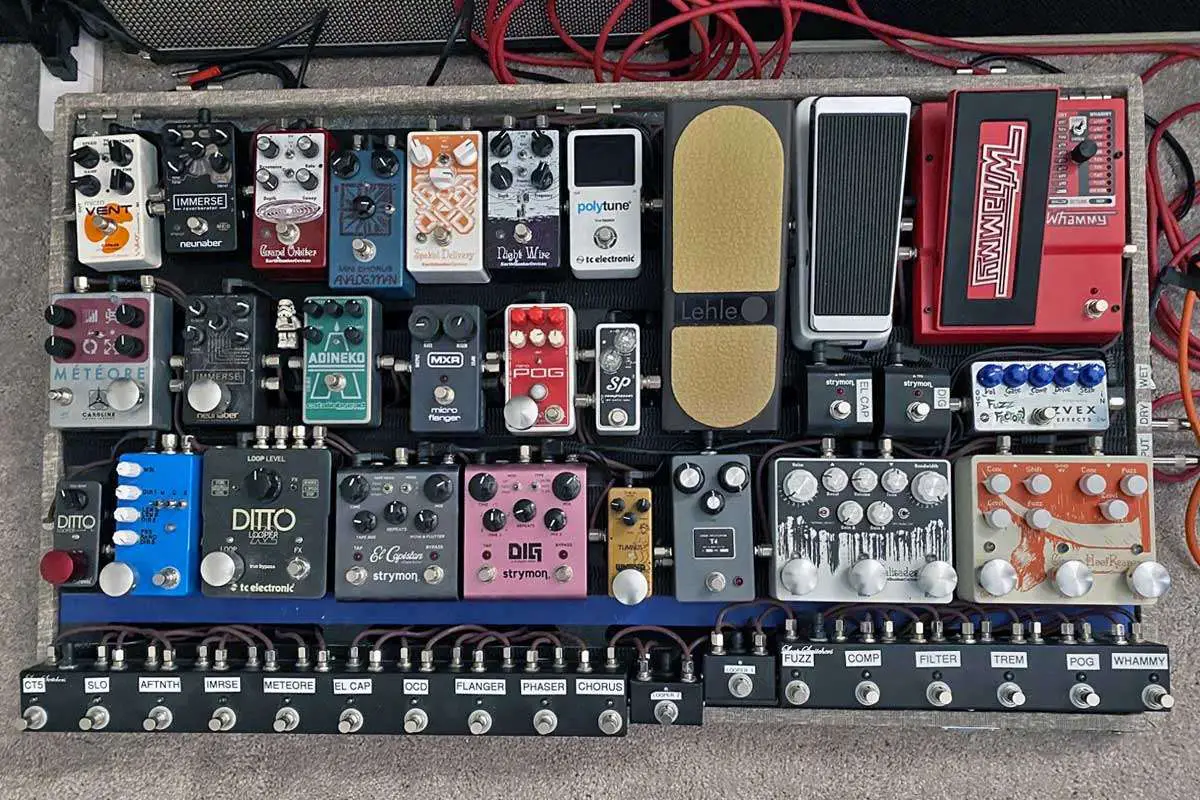
Crafting the perfect pedalboard chain is essential for guitarists looking to refine their sound. Deciding how to arrange your effects pedals can deeply influence your overall tone and the ease with which you can switch between sounds. Some musicians prefer to experiment with unconventional arrangements, while others adhere to tried-and-tested configurations. The pedalboard chain order can either muddy your sound or provide clarity and texture, offering the palette of sonic colors you’re truly looking for.
Understanding the workings of each pedal and how it interacts with others is key. Traditional setups typically begin with dynamic pedals like compressors, followed by overdrives and distortion pedals, which shape the raw signal. Modulation effects, such as chorus and flangers, and time-based effects, including delays and reverbs, often come later in the signal path, as they tend to work best when processing an already-shaped signal.
Ultimately, the pedalboard chain you assemble should complement your playing style and the genre of music you play. While there are suggested guidelines, the beauty lies in your freedom to explore different configurations, finding that sweet spot where each stompbox plays a role in producing your unique sound. Remember, technical knowledge, coupled with personal preference, is what truly shapes your tone on stage and in the studio.
Fundamentals of Pedalboard Setup
Creating an optimal pedalboard setup is essential for achieving your desired sound. It involves understanding the signal flow, choosing the right pedals, and ensuring seamless guitar and amp integration. Knowing how to arrange your pedals effectively can make a significant difference in your live performance or recording sessions.
Understanding Signal Flow
Your pedalboard’s signal chain begins with the guitar input and ends at the amp. The signal flow is the path your guitar’s signal takes through each pedal. To maintain tonal clarity, start with tuner pedals, as they’re typically the first in the signal chain for a clean, unaltered signal. Next, volume pedals and wah pedals are often preferred, given their expressive nature when manipulating the dynamics or the tone right from the instrument.
Choosing the Right Pedals
Selection should be based on the genres you play and the tones you need. Drive pedals, like overdrives, distortions, and fuzzes, tend to come early in the chain, as they shape the signal that subsequent effects will process. Effects that create ambience, like delay and reverb, generally come last in the pedal order to prevent muddying the sound they’re enhancing.
Guitar and Amp Integration
Integrating your pedals with your guitar and amp starts with matching the output levels to avoid signal loss or clipping. The input from your guitar should be clean and strong enough to feed into the pedals. After the signal has passed through your effects, the final output should match your amp’s optimal input level for the best sound quality. Keep in mind that some amps have effects loops, which can also impact guitar pedal order for time-based and modulation effects.
Dynamic and Gain-Based Effects
When crafting your pedalboard chain order, understanding the role of dynamic and gain-based effects is critical for shaping your sound. These effects can dramatically enhance your tone, providing the precision and control necessary for a polished performance.

Compressors and Sustain
A compressor is essential for managing the dynamics of your guitar’s signal. By evening out the volume fluctuations, a compressor adds clarity. This results in a more consistent & polished sound which is particularly useful for bringing out the sustain during your solos or finger-picking parts.
Overdrives, Distortions, and Fuzzes
For tonal transformation, you’ll incorporate overdrive, distortion, and fuzz effects. Overdrive subtly boosts your guitar’s gain, producing a warm, natural breakup. Distortion provides a more aggressive clip to your signal for a harder sound. Fuzz takes it further, creating a bold, buzzy tone often associated with classic rock and psychedelia.
- Overdrive: Subtle, warm gain boost, mimicing an overdriven tube amp
- Distortion: Aggressive, powerful clipping
- Fuzz: Bold, buzzy, and raw tonal change
Volume and Gain Control
Implementing a volume pedal or a gain control effect allows you precise management of your output signal, ensuring that you can swell in or fade out with ease. Additionally, a noise gate can be used in your dynamic and gain-based effects lineup to eliminate unwanted background noise, maintaining the cleanest signal path for your performance.
Modulation and Time-Based Effects
In crafting your guitar tone, the placement of modulation and time-based effects on your pedalboard can dramatically shape your sound. These effects, which include chorus, phasers, flangers, and tremolo, add texture, while delays and reverbs create ambient space and depth. Properly arranging these effects is key to maximizing their potential without muddying your overall sound.
Arranging Modulation Pedals
When setting up your modulation pedals, such as chorus, phasers, and flangers, their position in the signal chain can alter their impact. Typically, you’ll want to place them after distortion or overdrive pedals to prevent their modulating properties from being too aggressive. For instance, a chorus pedal, which can thicken your tone, tends to work best after distortion, ensuring a richer sound without overwhelming the effect of the overdrive.
- Order of Modulation Effects:
- Chorus
- Phasers
- Flangers
- Tremolo
The order of these modulation effects is not set in stone and can be adjusted based on your preference. However, keeping tremolo towards the end of the chain often helps it modulate the combined effects of the other pedals rather than just the raw signal.
Delays and Reverbs: Creating Ambience
Delays and reverbs are pivotal in adding dimension to your playing. Delays, which repeat your notes or chords, typically come right after modulation effects. Experiment with the delay’s feedback and decay settings to find the right repetition and fading effect that serves your music.
Subsequently, reverbs which simulate acoustic spaces, should be placed at the very end of your signal chain. This ensures everything you play is given the ambience of being in a particular space. Use the reverb’s decay control to adjust how long the sound lingers, creating anything from the sense of a small room to an expansive studio environment. Placing delays before reverbs helps to avoid a wash-out of your tone, maintaining clarity even with extensive ambience.
- Placement Tips for Delays and Reverbs:
- Delay before Reverb
- Adjust Delay feedback for desired repetition
- Set Reverb decay to replicate physical spaces
Advanced Pedal Configurations
When you’re setting up an advanced pedalboard, understanding the impact of signal chain components like buffers and the use of effects loops can greatly enhance your sound quality. Each component and its placement can affect the overall tone and noise level of your guitar.
The Role of Buffers and Impedance
Buffers play a crucial role in preserving your guitar’s signal strength across long cable runs and through multiple effects pedals. Think of a buffered pedal as a defense against signal degradation, especially high-frequency loss, which can occur due to impedance issues. This is vitally important when you’re using a multitude of effects pedals. Typically, placing a buffered pedal first in the chain, or near the start ensures that your signal remains strong and clear.
- Placement: Place your buffered pedal early in the signal chain.
- Objective: To combat tone loss and maintain signal integrity.
Utilizing Effects Loops
Many amplifiers feature an effects loop, a bypass route that allows you to insert effects directly into the amp’s signal path, after the preamp section. This is the ideal spot for modulation and time-based effects, as it keeps them from being muddled by the amplifier’s distortion. When you place your modulation pedals here, not only do you ensure clarity, but you also prevent the preamp from amplifying any noise introduced by the pedals.
- Location: Between the amplifier’s preamp output and power amp input.
- Effects: Delay, reverb, chorus, and sometimes a noise gate can be most effective here.
Remember to experiment with these configurations to discover the optimal setup for your unique sound.
Crafting Your Sound
Crafting your unique sound involves a careful blend of personal flair and professional insights. As you venture into this creative process, your pedalboard becomes a pivotal tool in shaping the exact tone and sound that defines you as a musician.
Experimentation and Personalization
Your quest to hone your guitar tone is as unique as your fingerprint. Begin by experimenting with various pedal combinations—you never know what might unlock your signature sound, just as innovative guitarists like Eddie Van Halen discovered through their own exploration. Start with your guitar and amp as a base. Then, methodically add one pedal at a time to see how each affects your rig. Personalization is key; there are no wrong choices, only stepping stones to finding what works for you.
- Distortion/Overdrive: Place these early in the chain to interact directly with your clean signal.
- Modulation (Chorus/Flanger/Phaser): Here’s the sweet spot for adding texture to your signal.
- Time-based (Delay/Reverb): Typically towards the end to apply space and dimension.
Signal Chain Tips from the Pros
Pros have spent years refining their chain for optimal sound. A common piece of advice is to prioritize tuner placement—it’s the gatekeeper of your signal. Then follow with dynamic pedals like compressors, which can help even out your performance and give sustain.
- Dynamic Pedals: After the tuner, place compression for a more consistent level across the board.
- EQ Pedals: Some prefer these after compression for precise tone shaping.
- Gain-based Pedals: Next, introduce your overdrives and distortions to shape your core sound.
Remember, while guidelines exist, there’s no absolute ‘right’ way. Take a leaf from the pros, but adapt their wisdom to suit your musical vision.