Proper guitar setup is essential for ensuring your instrument plays well, sounds its best, and remains in good condition. It involves adjusting several components of your guitar, including the strings, neck, and bridge, which can all affect playability and tone. Regular maintenance is not only about preserving the guitar’s aesthetics; it’s also crucial for the longevity and reliability of your instrument.
Through routine maintenance, you can also prevent common issues such as intonation problems, string buzz, and action discomfort—common complaints that can hinder your playing experience. Understanding the basics of a proper guitar setup is not only for professional guitar technicians; it’s knowledge that’s valuable for players of all levels.
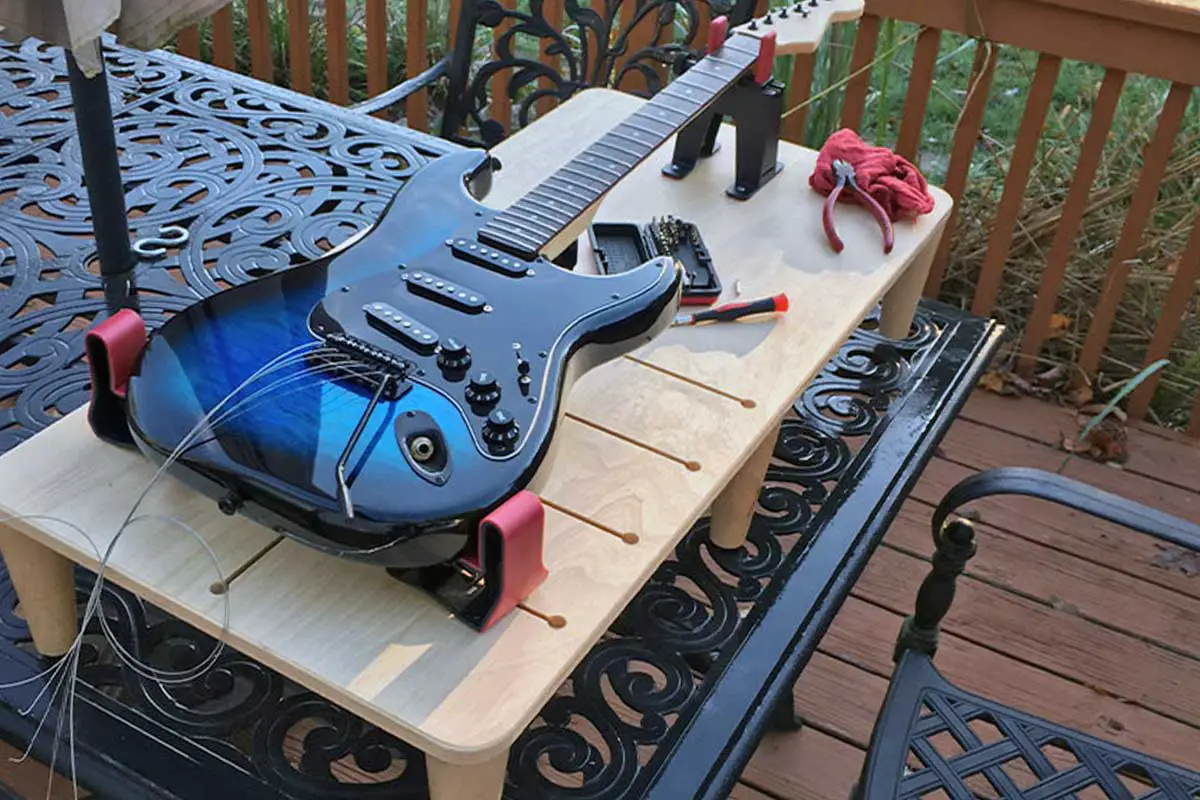
However, while some maintenance tasks can be simple, like cleaning the body and fretboard, others might require more specialized tools and knowledge, such as adjusting the truss rod or working on the guitar’s electronic components. If precise adjustments are beyond your comfort level, seeking professional assistance is recommended to avoid potential damage to your guitar.
Fundamentals of Guitar Setup
The fundamental process of a guitar setup is a meticulous series of adjustments made to optimize the instrument’s playability and sound. The setup begins with checking and adjusting the truss rod to ensure the neck is straight and has the correct amount of relief.
Next, the bridge height is modified to set the action, which can significantly affect both the feel and the intonation of the guitar. The nut height is then examined and adjusted if necessary to prevent buzzing at the lower frets and to make the guitar comfortable to play.
Intonation is fine-tuned so that the guitar plays in tune up and down the neck. Additionally, the electronics are inspected and cleaned or repaired to ensure they are functioning correctly. Finally, the strings are often changed to complete the setup process. These adjustments include:
- Truss rod adjustment
- Bridge height setting
- Nut height adjustment
- Intonation setting
- Electronics inspection & repair
- String replacement
Each step is crucial for the guitar to perform at its best, providing a comfortable playing experience and maintaining the instrument’s longevity and sound quality
Guitar Setup Tools and Materials
A standard guitar setup might require the following tools and materials:
- Tuner or electronic tuner: Essential for accurate tuning of guitar strings.
- Nut files: To adjust the width and depth of the nut slots.
- Radius gauge: For measuring the curvature of the fretboard and matching bridge saddle height.
- Truss rod wrench and Allen wrench: For adjusting the truss rod tension.
- Phillips-head screwdriver: For adjusting components like tuners or bridge parts.
- Microfiber cloth, polish, and guitar polish: For cleaning the guitar body, neck, and components to keep them in pristine condition.
By having these tools at the ready, you can address most aspects of guitar setup, ensuring your instrument remains well-calibrated and enjoyable to play.
Tuning & Intonation
Before you dive into the actual guitar setup, it’s critical to grasp the importance of tuning and intonation in ensuring your guitar plays in tune across the fretboard. Tuning aligns the strings to the correct pitch, while intonation ensures that your guitar maintains accurate pitch up and down the neck.
Tuning Techniques
To begin standard tuning your guitar, you’ll need a reliable guitar tuner. Start with the low E string and proceed string by string up to the high E string. Strum the string lightly and adjust the tuning peg until the tuner indicates that the string is in tune. For an electric guitar like the Fender Stratocaster, ensure it’s plugged into the tuner to capture the most accurate signal. It’s worth noting that environmental factors like temperature can affect the tuning, and even small tuning errors can have a noticeable impact when playing fretted notes. The guitar string frequencies are also noted below in Hertz if you want to be exact.
- Standard Tuning (EADGBE):
- Low E (6th string): E2 – 82.41 Hz
- A (5th string): A2 – 110.00 Hz
- D (4th string): D3 – 146.83 Hz
- G (3rd string): G3 – 196.00 Hz
- B (2nd string): B3 – 246.94 Hz
- High E (1st string): E4 – 329.63 Hz
Related: How To Memorize The String Names
Intonation Adjustment
Intonation trouble is often noticeable when a string plays in tune in the lower frets but is sharp or flat at higher frets. To adjust intonation on a guitar with adjustable saddles, like many electric guitars, compare the pitch of a fretted note at the 12th fret to the harmonic at the 12th fret. If the fretted note is sharp, move the saddle back; if it’s flat, move the saddle forward. For a guitar with nonadjustable saddles, you may need to visit a professional technician for a more involved setup or potential modifications.
- Intonation Steps:
- Tune the open string accurately.
- Compare the pitch of the 12th fret note to the 12th fret harmonic on the same string.
- Adjust the saddle:
- If the fretted note is sharp, lengthen the string by moving the saddle back.
- If the fretted note is flat, shorten the string by moving the saddle forward.
- Retune the open string and recheck the 12th fret until both pitches match.
Action & Truss Rod Adjustment
Properly setting your guitar’s action and adjusting the truss rod are key steps in achieving optimal playability. These adjustments influence string height and neck curvature, which are critical to a comfortable playing experience and clear sound without fret buzz.
Setting the String Action
To set the string action, check the height of the strings above the frets. Start by measuring at the 12th fret using a ruler or a specialized measurement tool. Ideally, the string height, also known as action, should be low enough to play comfortably but high enough to prevent fret buzz. For electric guitars, adjustable saddles on the bridge allow you to raise or lower each string individually. Remember, the desired action may vary depending on your playing style.
Adjusting the Truss Rod
The truss rod maintains neck stability and provides relief to counteract the tension of the strings. To adjust the truss rod, first ensure the neck is straight by using a straight edge or looking down the neck from the headstock toward the bridge. If you notice a bow in the neck, adjust the truss rod accordingly. Tightening a single-action truss rod draws the neck back, reducing relief, while loosening the rod allows more neck curvature. A double-action truss rod can compensate for both forward and backward bowing. Always make adjustments in small increments to avoid damaging the neck.
Guitar Bridge & Nut Maintenance
Proper maintenance of your guitar’s bridge and nut is crucial to ensure optimal playability and tone. Correct bridge setup and nut care can prevent common issues like buzzing and dead notes.
Bridge Setup
Your bridge is a key factor in maintaining string tension and setting your guitar’s intonation. Bridge height affects both the action and the intonation of your guitar, so it’s important to set it correctly to avoid fret buzz. Use an allen wrench to adjust the saddles to the recommended height for your guitar model, ensuring that each string’s intonation is accurate. For electric guitars, you might adjust each saddle individually, while on many acoustics, you may have a single piece that raises or lowers the action for multiple strings.
Nut Care and Adjustment
The nut defines the spacing, height, and angle of the strings at the headstock end. Incorrect nut height can lead to buzzing strings or hard-to-play action. Nut files are used for precise adjustment, allowing you to lower the slots if necessary. The strings should sit snugly without too much free space to avoid buzzes and dead notes. If the nut slots are cut too low, you might experience buzzing; too high, and the guitar becomes difficult to play.
Electronics & Pickups
When setting up an electric guitar, the electronics and pickups are pivotal for defining your sound and ensuring minimal noise interference. The types of pickups you select and how you configure them, along with the handling of onboard controls, can drastically alter your tone.
Pickup Configurations and Height
Pickup Configurations:
- Single Coil: Characterized by a bright, crisp sound but prone to 60-cycle hum, especially in high-gain settings.
- Humbucker: These pickups are essentially two single coils paired together to ‘buck’ the hum, producing a warmer, richer tone with less noise.
Pickup Height Adjustment: The distance between the pickups and the strings affects tone and volume. Here’s how you can adjust the pickup height:
- Closer to Strings: Results in a stronger, more immediate response but risk increased noise and magnetic interference.
- Farther from Strings: Yields a clearer tone with less output.
To adjust the height: turn the screws at either side of the pickup to raise or lower. It’s important to balance the output levels of each pickup to your preference.
Handling Electronics and Controls
Electronics: Ensure that all connections are secure, and your soldering is neat. Utilize contact cleaner on pots and switches to prevent crackling and sustain a clean signal path.
Controls:
- Volume and Tone Pots: They should rotate smoothly without noise. Check and replace any that seem scratchy or unresponsive.
- Switches: Function should be crisp, and positions well-defined. Loose or ambiguous switches can lead to signal loss or unwanted noise.
Observations:
- Clean electronics with care, avoiding any rough handling that could dislodge wiring or components.
- Inspect pole pieces for corrosion or misalignment; they should be adjusted according to string radius for even response.